New version of the Fast Sketch Cleanup Plugin
If you don’t know what Fast Sketch Cleanup plugin is, here’s a blog post describing it in detail: https://krita.org/en/posts/2024/fast_sketch_background/. In short, it’s a neural network-based filter similar to Edge Detection or Engrave that is supposed to clean up a sketch and create lines that can be used as a base for a lineart or help with coloring.
Download
Windows
- Plugin: FastSketchPlugin1.1.0.zip
- Portable zip file: krita-x64-5.3.0-prealpha-68346790.zip
Linux
- 64 bits Linux: krita-5.3.0-prealpha-68346790dc-x86_64.AppImage
New GUI
The old GUI was relatively difficult to use and quite limited. For example, there was no way to use a custom model outside of the main directory, you’d have to manually put the model files into the main directory of the plugin. There was also no pre- or post-processing, and the resolution of the input image was fixed, which didn’t allow for fine-tuning the result.
The new GUI looks like this:
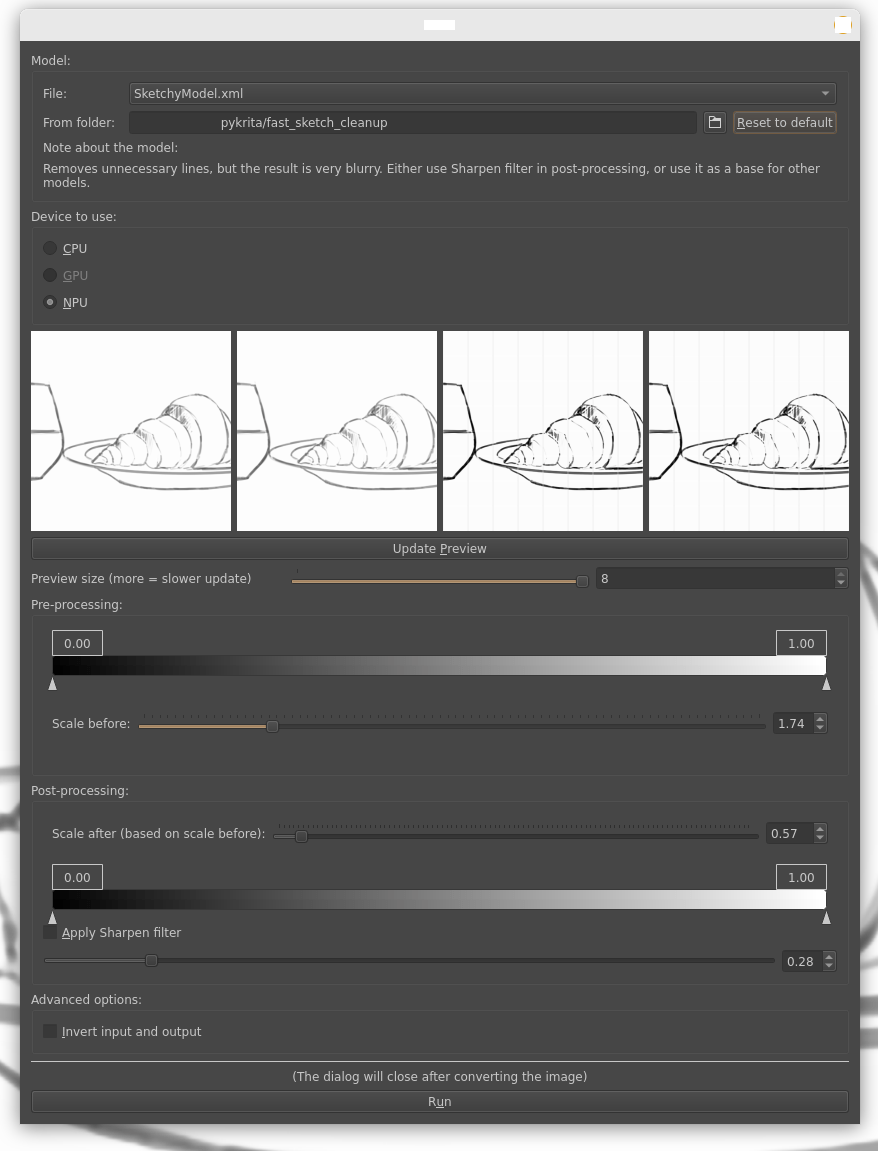
Model
In this section you can select the model in the File combobox, or you can switch to another folder using either the button with the folder icon (for a custom folder) or the “Reset to default” button (which resets the path to the default path for the plugin). The combobox with models gets updated to show the models from the currently selected folder.
“Note about the model” presents some notes or hints about usage that were saved into the model information file.
Device to use
Here you can choose whether to use CPU, GPU or NPU. NPU is a new type of device that is only available on some computers, on Windows you should have all the drivers already installed, but if you’re on Linux, you would need to install them manually. CPU is typically the slowest, so if any other is available, use the other one. Unavailable devices should be greyed out.
Preview images
Those are small cutouts of the image on different stages of the processing. First image shows the original sample; the second one shows the result of the pre-processing; third shows the result of the inference (processing through the model) applied to the pre-processed image; and the last one shows the final result.
Preview size determines how big the preview is. The sample is cut out of the center of the image, with the width and height being equal to the Preview Size * Model Input Size (usually 256) / Scale. That means that a Preview Size of 8 would update roughly 16x slower than Preview Size of 1, no matter the Scale, and assuming the same model. That might make the dialog less responsive, so be careful with higher values. Sometimes it is useful though to see a bigger preview though.
If you click on one of the images, it will bring out a dialog showing the same image in a bigger size, and you can click on the buttons or use arrows to navigate to the other images. You can resize that dialog to see even more detail if needed.
Pre-processing
Defines the pre-processing. It’s performed in the order of the widgets in the dialog.
Levels widget: it’s a quick way to increase contrast in the input image.
Scale: every model has a specific size of its context window, which means it’s sensitive to resolution. Using Scale you can quickly decrease or increase the resolution of the input image, changing the result in a very significant way. Be careful, it’s a scale for one dimension, meaning that the processing time will increase or decrease exponentially.
Post-processing
Scale: it’s just a widget showing the reversal of the scaling in pre-processing. You can’t change it. It ensures that the result has the same size as the input image.
Levels widget: it works just like in the pre-processing.
Sharpen filter: it sharpens the result, with the strength equal to the number from the slider. Zero means input = output, every higher value sharpens the result. One means the exact result you’d get from Krita’s normal Sharpen filter.
Advanced options
Invert: usually you don’t need to change this option, because whether it needs to be checked or not is embedded in the model information file (the same one that contains the note). Most models do require this checkbox checked.
Run
Press the button to start processing. It takes the projection (think: “New Layer From Visible”) of the canvas, puts it through all the processing, and then creates a new layer with the result.
The Run button changes into a Progress Bar to show you progress. When the image is processed, the dialog closes automatically.
Note that it’s not possible to cancel the processing, unfortunately.
Best workflow
The ultimate best workflow I found to get the best result is to first use SketchyModel.xml with low scale (either 1.0 or often even below that), then either decrease the opacity of the result or put a white semi-opaque layer on top, and then use InkModel.xml. The first model removes unnecessary lines and smoothes the lines out, and the second model creates nice, crisp lines. The only problem with using them one after another is that SketchyModel produces pretty dark lines, while InkModel is sensitive to values and requires the input to be light grey, otherwise it doesn’t work properly, hence the additional white layer.
You can also use InkModel.xml directly, if the sketch is clean enough already.
Example 1.
The following examples are derivatives of David Revoy’s sketch “Pepper Sketch”, with the only editing being the FSC plugin or Engrave G’MIC filter (used for comparison).
Workflow:
- Use SketchyModel, Levels: (0.3, 1.0)
- Add a white layer, opacity = 40%
- Use the mentioned model or G’MIC filter.
Results:
- Original sketch:

- Result of SketchyModel, with Preprocessing: Levels (0.30, 1.00), and then with a white 40% transparent layer on top:


- Results of the workflow with, in order of appearance: a) SoftInkModel, scale 4.0, b) InkModel, scale 4.0, c) InkModel, scale 6.0:


- Result of G’MIC’s filter Engrave, in order of appearance: a) over the original sketch, b) over the version smoothed out by SketchyModel:


Example 2.
The following example is a derivative of “Pepper and Carrot in traditional clothing” by David Revoy.
Workflow:
- Use SketchyModel, with standard options, Scale = 1.0.
- Add a white layer with 40% opacity.
- Use InkModel, Scale = 4.0.


Example 3.
The following example is a derivative of “Huge machine to maintain” by David Revoy.
Workflow:
- Use SketchyModel, Levels in preprocessing: (0.0., 0.82) (to whiten the background), Scale either 1.0 or 2.0.
- Add a white layer with 40% opacity.
- Use InkModel, Scale - 4.0.
Original:

Using SketchyModel at Scale 1.0 (resulting in less details):

Using SketchyModel at Scale 2.0 (more details):
Workflow 2.
- Just using InkModel, with Levels (0.0, 0.9) and Scale = 4.0.
Result:
